
AF 5070M BT - Cadre photo numérique SAGEM - Notice d'utilisation et mode d'emploi gratuit
Retrouvez gratuitement la notice de l'appareil AF 5070M BT SAGEM au format PDF.

| Type de produit | Cadre photo numérique |
| Marque | SAGEM |
| Modèle | AF 5070M BT |
| Écran | 7 pouces TFT LCD, compatible 16:9 et 4:3 |
| Formats image pris en charge | JPEG jusqu'à 26 mégapixels |
| Formats vidéo pris en charge | MJPEG (AVI) |
| Formats audio pris en charge | MP3 |
| Mémoire interne | 128 Mo Nand Flash |
| Support de carte mémoire | SD, MMC, MS |
| Connectivité | Bluetooth V2.0+EDR, USB 2.0 High Speed (hôte et périphérique) |
| Haut-parleur intégré | Puissance de sortie 2 W, prise casque 50 mW / 20 Ω |
| Alimentation | Adaptateur secteur AC 100-240 V, sortie DC 9 V / 2 A |
| Dimensions (sans support) | 209 × 141 × 25 mm |
| Poids (support inclus) | 460 g ± 5 g |
| Fonctions principales | Diaporama avec effets de transition, rotation des photos, horloge, alarme, calendrier, répétition musique, cadre interchangeable |
| Accessoires inclus | Adaptateur secteur, câble USB, support, télécommande, manuel d'utilisation |
| Langues d'interface | Anglais, Français, Allemand, Espagnol, Italien, Néerlandais, Polonais, Tchèque, Hongrois, Turc, Russe, Suédois, Grec, Portugais |
| Température de fonctionnement | -10°C à 60°C |
| Entretien et nettoyage | Essuyer avec un chiffon doux et sec. Ne pas utiliser de produits abrasifs ni de solvants. |
| Sécurité | Ne pas exposer à l'humidité, poussière ou sources de chaleur. Utiliser uniquement l'adaptateur fourni. |
| Garantie | 12 mois contre les défauts de fabrication (pièces et main-d'œuvre). |
FOIRE AUX QUESTIONS - AF 5070M BT SAGEM
Questions des utilisateurs sur AF 5070M BT SAGEM
0 question sur cet appareil. Repondez a celles que vous connaissez ou posez la votre.
Poser une nouvelle question sur cet appareil
Téléchargez la notice de votre Cadre photo numérique au format PDF gratuitement ! Retrouvez votre notice AF 5070M BT - SAGEM et reprennez votre appareil électronique en main. Sur cette page sont publiés tous les documents nécessaires à l'utilisation de votre appareil AF 5070M BT de la marque SAGEM.
MODE D'EMPLOI AF 5070M BT SAGEM
Table of Contents
| Welcome | 2 |
| Safety Instructions and Recommendations | 2 |
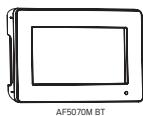
| Product | 3 |
| Your Digital Photo Frame and Its Accessories | 4 |
| Specifications | 5 |
| Description of the User Interface | 6 |
| Setting Up the Digital Photo Frame | 7 |
| How to Change the Frame | 8 |
| Remote Control | 9 |
| Bluetooth Transfer | 10 |
| Reading Photo Mode [Viewing JPEG/AVI [MOTION JPEG] Files] | 12 |
| Turning on the Digital Photo Frame | 12 |
| Viewing Images | 13 |
| Slideshow | 13 |
| Photo Rotation & Display Ratio | 13 |
| Playing Video Clips | 14 |
| Time Mode | 14 |
| MP3 Mode | 15 |
| Setup Mode | 16 |
| Card Reader [Mass Storage Mode] | 17 |
| Mini USB Device Unplugging Notice | 18 |
| Trouble Shooting | 19 |
| Guarantee | 20 |
ENGLISH
Welcome
Thank you for purchasing our new photo frame. With this high quality product you can get the most out of your digital photos. You will also find some more information the web site: www.agfaphoto.com
▶ Safety Instructions and Recommendations
Do not install your photo frame in a humid room (bathroom, bands)

Do not install your photo frame in a humid room (bathroom, laundry, kitchen, etc.), or within 1.50 m of a tap or water source, or outside. The operation temperature of the photo frame can be from -10°C to 60°C Do not set up your photo frame in a dusty environment.

Only use the power supply that is supplied. Connect it to a main outlet in compliance with the installation instructions in this booklet and the indications stated on the identification label located on the unit voltage, current and frequency of the electricity network. As a precaution, in case of danger, the mains adaptors act as a disconnecting mechanism for the 100-240V AC power supply. They should be placed near the device and should be easily accessible. If your product contains batteries, they must be disposed of at a appropriate collection point.

XPLOSION IF BATTERY IS REPLACE BY AN INCORRECT TYPE

The CE marking certifies that the product meets the main requirements of the European Parliament and Council directive 1999/5/CE on telecommunications terminal equipment, regarding safety and health of
users, and regarding electromagnetic interference. The declaration of complexes can be consulted on the site.
The declaration of compliance can be consulted on the site www.agfarboto.com, or can be requested at the following address:
WWW.ugraphoto.com, or can be requested by the following business:
AGFAPHOTO is used under licence of Agfa-Gevaert NV & Co.KG AF5070M is produced for Sagem Communication and distributed or sold by
Sagem Communication
Sagem Communication - Customer relations department
Environment
Preservation of the environment as part of a sustainable development logic is an essential concern of AgfaPhoto. The desire of AgfaPhoto is to operate systems observing the environment and consequently it has decided to integrate environmental performances in the life cycle of its products, from manufacturing to commissioning, use and elimination.

The presence of the logo (green dot) means that a contribution is paid to an approved national organisation to improve packaging recovery and recycling infrastructures. To facilitate recycling, please respect the sorting rules set up locally for this kind of waste.
(2) 1987. For one time of operation

The crossed-out waste bin stuck on the product means that the product belongs to the family of electrical and electronic equipment. In this respect, the European regulations ask you to dispose of it selectively: - At sales points in the event of the purchase of similar equipment. - At the collection points made available to you locally (drop-off centre, selective collection, etc). In this way you can participate in the re-use and upgrading of Electrical and Electronic Equipment Waste, which can have an effect on the environment and human health.
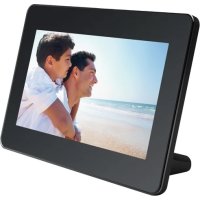
Your Digital Photo Frame and Its Accessories


Specifications
Display:
7'TFT LCD
Supports 16:9 and 4:3 displays
English, French, German, Spanish, Italian,
Dutch, Poland, Czech, Hungarian, Turkish, Russian, Swedish, Greek, Portuguese.
JPEG [up to 26 Mega Pixels
MIPEG (AVI), MP3
SD/MMC/MS Card s
Built-in Speaker and Phone Jack
(Speaker audio output:2W. Phone jack Spec:50mW 20Ω.)
MP3
Nand Flash(128MB)
USB2.0 High speed, Bluetooth V 2.0+EDR
IR Remote Control
Slide show with various transition effects Photo rotation Alarm Clock & Calendar
USB 2.0 Host/ Device (Mass Storage Device).
The LCD di USD Gall
USB Cable Adaptor [100V-240V]
Instruction Manual, Stand Remote control
209X141X25mm (L
( stand not included )
460g ± 5g (stand included)
Input AC 100V-240V
Output DC 9V, 2A
Pentium 166 MHz processor or higher Microsoft Windows 2000/XPO/ISTA
Available USB port
Super VGA video card and
Mass Storage Operating System: Windows 2000, XP, VISTA
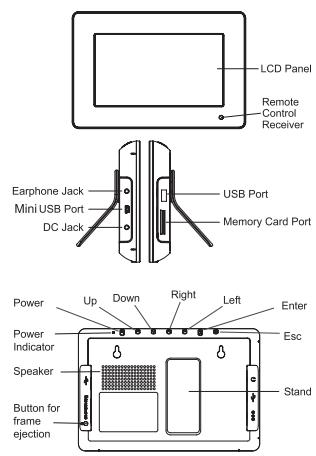
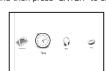
▶ Description of the User Interface

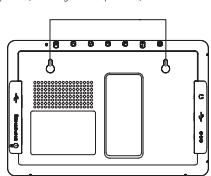
Setting Up the Digital Photo Frame

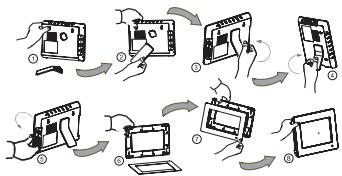
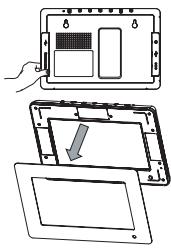
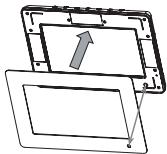
▶ How to Change the Frame
- Press the ejection button to take out the existing frame.
2. Reassemble the new frame by fitting it on the middle cover (pay attention to the mounting direction: the side with a remote control receiver hole.)
Remote Control
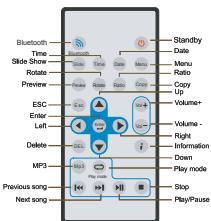
| Play | Press standby button to turn on/off backlight | Text | Show time in the Reading Photo mode | |
| Share | Images will show automatically one by one | Message | After entering some mode,Press Menu button to return to the main menu. | |
| Date | Show date in the Reading Photo mode | Role | Rotation of images can be activated. | |
| Picture | View all image thumbnails in the Reading Photo mode | Copy | In the Reading photo mode, files saved in a memory card can be copied to internal memory. | |
| Radio | Aspect 4.3 16:9 | Data transfer | ||
| Music repeat playback | i | Show image's resolution | ||
| Previous song Next song Play/Pause Stop | ||||
Bluetooth Transfer
Turn on the AF 5070M BT Photo Frame
Lock blue tooth equipment Turn on the bluetooth equipment that you use - Mobile phone (PDA etc.)
1) Enter the Bluetooth and select "match the device", then confirm enter. Meanwhile, the "adding the device" will be displayed on the screen of the mobile phone. Press the adding button on the mobile phone to enter the automatically search
2) The mobile phone will display that find the device of the AF 5070M BT at this moment. Press the confirm button on the mobile phone to enter, then input the password "0000" to confirm. The mobile phone will display the AF 5070M BT locked successfully.
Date transfer
- Transmission from Bluetooth equipment to the photo frame
1) Choose the file (picture) that you want to transmit in your mobile phone, and select the pathway (through Bluetooth) and confirm, and then the mobile phone will display on searching. If it searches successfully, it will display "finding the device". Press the confirm button on the mobile phone, it will display on connecting and at once it transfer waiting other devices to accept the project. On the screen of the Photo Frame it will be displayed the "Saving remote file?"

2) Press the Enter button on the photo frame or on the remote control to confirm. Within 15 seconds, the mobile phone will transmit the picture that you selected to the photo frame.

3) Press the ESC button on the remote control to enter to the Picture mode. You can see the picture had been transmitted.

Reading Photo [ Viewing JPEG/AVI ( MOTION JPEG ) Files]
● Turning on the Digital Photo Frame
- Connect the Digital Photo Frame to the DC 9V adapter.
- To read files from a memory card, insert a memory card into the Digital Photo
Frame Memory Card Slot first. The Digital Photo Frame is equipped with internal memory, which can be pre-loaded with images from your PC(see P15). - Press the "Power" button on the Digital Photo Frame to activate it.
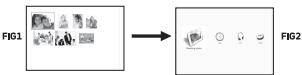
- The Digital Photo Frame will automatically recognize image or video files saved
in a memory card or in internal memory, and it will display all image or video thumbnails.
5.1 To start viewing images or playing video clips, see the below section "Viewing
Images" or "Playing Video Clips."
5.2. To return to the main menu, press the "ESC" button or the "Menu" button on the remote control as shown in FIG2. To enter the thumbnail mode
again, press the "UP", "DOWN", "LEFT" or "RIGHT" button (the navigation buttons on the remote control) to select the playback
in the main menu and then press the "ENTER" button.

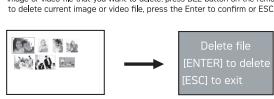
5.3. To delete image or video clip. Press "up", "down", "left", "right" button select the image or video file that you want to delete press DEL button on the remote control
- Viewing Images
- After entering the thumbnail mode, press the "UP", "DOWN", "LEFT" or "RIGHT" button (the navigation buttons on the remote control) to select the thumbnail to view. Press the "ENTER" button to enlarge the image.

-
To view the previous image, press "UP" when an image is enlarged. Press "DOWN" to view the next one.
-
Slideshow
3.1.1. When in the thumbnail mode, press the "Slide" button on the remote control
3.1.2. When an image is enlarged, press either the "Slide" button on the remote
control or the "ENTER" button
3.2. Stop viewing the slideshow.
Press ENTER to stop at the current full-sized image. To return to the thumbnail mode, press "ESC" or the "Preview" button on the remote control.
- Photo Rotation & Display Ratio:
4.1 When the display ratio is set to 4:3, an enlarged image can be rotated by pressing "RIGHT" LEFT as the "Rotate" button on the remote control. Cross "RIGHT" to
RIGHT, LEFT, of the "Rotate" button on the remote control Press "RIGHT" to rotate the current image clockwise rotate; press "LEFT" to rotate anti-clockwise.
4.2. To change the display ratio, press the "Ratio" button on the remote control when
in the Reading Photo mode. Or set the ratio in the setup mode. See "Setup Mode" section.
- Press the "ESC" button to return to the previous mode or press the "Menu" button
on the remote control to return to the main menu,
[Non-Text]
Notice:
Internal memory is optional. JPEG/AVI(MOTION JPEG)files saved in the internal memory area, but played in the Digital Photo Forms without a memory card.
memory can be played in the Digital Photo Frame without a memory card.
- Playing Video Clips
-
After entering the thumbnail mode, press "UP", "DOWN", "LEFT" or "RIGHT" (the navigation buttons on the remote control) to select the thumbnail to play.
-
Press "ENTER" to start playing a video clip
-
Press "ENTER" again to pause. To continue playing, press "ENTER".
-
Press "ESC" on the main menu.
Notice: The Digital Photo Frame only supports MOTION JPEG video format.
Time Mode
- Press "UP", "DOWN", "LEFT" or "RIGHT" to select the icon Ⓧ in the main menu and then press "ENTER" to enter the Time Mode
3.2.1.1.1.2.1.3.
-
Date, Time and Alarm function can be set according to your need.
-
To conserve power, the LCD display Auto on/off time can also be set according to your need.
-
Press "UP" or "DOWN" to select items; press "ENTER" to confirm; Press "UP" or
"DOWN" to change settings.
- Press "ESC" to save the settings and exit. (See the "Chaw Time" and the "Chaw Color
[See the 'Snow Time' and the 'Snow Calendar' sections in the Setup Mode.
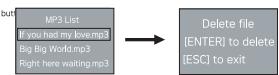
MP3 Mode
- Press the "MP3" button on the remote control to enter the MP3 mode. Press the "menu" button on the remote control to return to the main menu. Or press


-
Press "UP", "DOWN", "LEFT" or "RIGHT" to select MP3 files.
-
Press "previous song" or "next song" button on the remote control can be
-
Press the "vol+" / "vol"- button on the remote control to adjust the volume.
-
To delete MP3 file.Press "up", "down", "left", "right" button select MP3 file tha
want to delete .press DEL button on the remote control to delete current MP press the Enter to confirm or FEC to exit.

-
Press "ENTER" (or the play button on the remote control) to play a song. Press
-
Press "ESC" to stop and return to the main menu
-
Press - 256 to stop and return to the main menu;
-
Transmission from the photo frame to the Bluetooth equipment.
1) Select the file (picture) in the picture mode of the photo frame, then press "Bluetooth" button on the remote control, and the "Scanning Bluetooth Device" will display on the LCD of the photo frame as shown below.

2) After scanning successfully, the photo frame will display the code of your mobile phone[If it does not recognize the code of your mobile phone, please renew to lock the blue tooth]. Select the code of your mobile phone, then press the confirm button of it to enter. Photo frame will start to connect with the mobile phone and send the signal of request to it [sending]

3) After mobile phone receiving the signal of accepting request from photo frame, then press the confirm button on the mobile phone to receive the information and display the size of the information. After receiving all the information, please press the confirm button on the mobile phone.
Notice: the effective distance is best within 4M.
—Language
English, French, German, Spanish, Italian, Dutch, Poland, Czech, Hungarian, Turkish, Russian, Swedish, Greek, Portuguese
Turkish, Russian, Swedish, Greek, Portuguese —Format storage
Format Storage Delete al interr
[ENTER] Yes
[ESC] No
It can select Yes/No by pressing the Enter or ESC button on the remote control.
- To complete Setup, please press "ESC" to save the setting and exit.
Mini USB Device Unplugging Notice:
To unplug the Digital Photo Frame from the computer, be sure to stop the device
Beforehand. To stop the Digital Photo Frame, please follow the steps below: Removing the Digital Photo Frame from a PC: (For Windows 2000/XR/VISTA)
- - -
-
Click on the "8" device icon located on the taskbar. Select the device you want to stop [e.g. Stop USB Mass Storage Device Drive (E)].
-
Follow on-screen instructions to safely remove the Digital Photo Frame
Notice:
The D
reader (mass storage device) by connecting the Digital Photo Frame to a computer via USB. [See "Card Reader" section.]
Trouble shooting
| Failure symptom | Probable cause and possible solution |
| No power supply | If there is no power supply, verify that the photo frame is well connected to its power supply (lock and if the better is connected to the sector. |
| No display | 1.Verify that you have inserted a memory card or a USB key properly into the appropriate readers and that the better contain files legible by the apparatus onlyPEG or MPEG/AVG formats are supported.2.Only support XD-Picture Card: Type M till 256MB |
| The remote controller does not function | 1. The distance is too long or the angle exceeds 30 degrees.2. The battery of the remote controller is dead.3. The infrared sensor is in direct sunlight. |
| Your photo frame powers down or goes back to its welcome screen | This may be provoked by an electrostatic environment. You should not make a stop/forward step of your photo frame. If you know its origin, and keep the frame away from the source generating electrostatic problems(ESD). |
| It does not function with a PC | Check the USB connections with your PC and ensure your operating system is compatible with the AP5070M (see PS) |
▶ Guarantee(Uk Term And Conditions)
In order to supply the guarantee, you should contact your dealer. Proof of purchase will be required. Should malfunctioning arise, the dealer will advise you what to do. If you bought your equipment from SAGEM directly, the following shall apply: A) SAGEM undertakes to remedy by repair, free of charge for labor and replacement parts, any defects in the equipment during a period of twelve (12) months from the date of original delivery of the Equipment, where those defects are a result of faulty workmanship.
During this twelve month guarantee period, the defective equipment will be repaired free of charge; the customer must however return the defective equipment at his/her own expense, to the address given by SAGEM After Sales Department, the phone number of which can be found on the delivery slip. Unless the customer has concluded with SAGEM a maintenance contract in respect of the equipment which specifically provides for repairs to be carried out at the time of sale. The company is not necessarily an equipment at its customer's premises. The following sentence applies to purchases of equipment for the customer's trade, business or profession. Except as otherwise expressly provided in this document and to the extent permitted by law, SAGEM makes no representations or warranties, express or implied, statutory or otherwise, and to such extent, all terms and conditions implied by law are hereby excluded. This guarantee does not affect the Customer's statutory rights.
B] Exclusions From Guarantee
SAGEM shall have no liability under the guarantee in respect of:
- damage, defects breakdown or malfunction due to: - failure to properly follow the installation process
- an external cause to the equipment [including but not limited to, lightening, fire
- shock or water damage of any nature; or - modifications made without the written approval of Sagem Communication; or
- unsuitable operating conditions, particularly of temperature and humidity; or
- repair or maintenance of the equipment by persons not authorized by SAGEM.
- wear and tear from normal daily use of the equipment and its accessories - damage due to insufficient or bad packaging of equipment when returned to
SAGEM
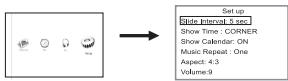
Setup Mode
- Press "UP", "DOWN", "LEFT" or "RIGHT" to select the icon 😊 in the main menu. Press "ENTER" to enter the setup mode
-
Press "UP", "DOWN", "LEFT" or "RIGHT" to select items. Press "ENTER" to change settings
-
Note the f
—Slide Interval
5/10/30/60
—Show Time
Off/Center/C
When it is set to center/corner, the time will be displayed in the playback mode accordingly. It can also be switched to off/center/corner by pressing the "Time
—Show Calendz
ON/OFF
When it is set to ON, the calendar and date that have been set in the Time
Mode will be displayed in the playback mode. It ca pressing the "Date" button on the remote control.
—Music Repeat
ALL/ONE/NONE
-Aspect
4:3/16:9
Set the display ratio of images. See the "Photo Rotation & Display Ratio" section in the "Playback Mode."
-the-Playback —Volume
0\~9

● supply of new versions of software
- work on any equipment or software modified or added without the prior written consent of SAGEM malfunctions not resulting from the Equipment or from
software installed in user workstations for the purpose of use of the equipment. Communication problems related to an unsuitable environment including
- communication problems related to an unsuitable environment including: - problems related to access and/or connection to the Internet such as
interruptions by access networks or malfunction of the line used by the subscribers or his correspondent.
- transmission faults [for example poor geographical
transmitters, interference or poor line quality) - the local network fault (wiring servers workstations) or the failure of the
the test network test (Wiring, Server, Remutations) of the letters of the transmission network
- the normal servicing [as defined in the user guide supplied with the equipment] as well as malfunctioning due to servicing not being carried out, servicing parts
as well as malfunctioning due to servicing not being carried out, servicing costs are in any event always borne by the customer.
(1) 2017年,公司与上海浦东发展银行股份有限公司签订了《关于使用部分闲置募集资金进行现金管理的协议》。
C) In the cases set forth in B) as well as after expiry of the twelve month guarantee period, the customer must ask SAGEM for an estimate, and he/she must accept the estimate and agree to pay the charges mentioned in it before returning the equipment to SAGEM. The repair and delivery costs will be invoiced to the customer.
The foregoing shall apply unless otherwise agreed in writing with the customer and only for the UK. If any provision of this guarantee shall be held to be in whole or in part invalid or illegal due to an obligatory rule applicable to consumers pursuant to their national legislation such invalidity or illegality shall not impair or affect the remaining provisions or parts of this guarantee.
Card Reader (Mass Storage Mode)
-
Connect the Digital Photo Frame to a computer with the supplied USB cable
-
In Mass Storage mode, the Digital Photo Frame with a memory card acts exactly
like a Card Reader. It can be accessed via any Windows user interface. Pictures or video clips can be copied, moved or deleted in exactly the same way PC files are
manipulated. (See "USB Device Unplugging Notice" section
Notice:
- In the Reading Photo mode, files saved in a memory card can be copied to internal memory by pressing the "Conv" button on the remote control. But the function will
memory by pressing the "copy" button on the remote control. But the function was not be effective if the Digital Photo Frame does not equipped with internal memory.
-
The Digital Photo Frame does not display files saved in internal memory unless a
-
The Digital Photo Frame does not display files saved in internal memory unless a memory card is removed. With an inserted memory card, the Digital Photo Frame
will only capture files saved in a memory card.


- ENGLISH
- Welcome
- Sagem Communication
- Environment
- Your Digital Photo Frame and Its Accessories
- Specifications
- ▶ Description of the User Interface
- ▶ How to Change the Frame
- Remote Control
- Bluetooth Transfer
- Reading Photo [ Viewing JPEG/AVI ( MOTION JPEG ) Files]
- ● Turning on the Digital Photo Frame
- - Viewing Images
- - Playing Video Clips
- Time Mode
- MP3 Mode
- Mini USB Device Unplugging Notice:
- Trouble shooting
- ▶ Guarantee(Uk Term And Conditions)
- Setup Mode
- Card Reader (Mass Storage Mode)
Marque : SAGEM
Modèle : AF 5070M BT
Catégorie : Cadre photo numérique